Made with Moxie: flower
Showing posts with label flower. Show all posts

November 28, 2012

Felt Matryoshka Nesting Doll Ornaments

Everything I do I must make more complicated. I decided to make these little Russian doll ornaments to add into a Christmas gift for a friend. Then I thought, hey, I should make them into a blog post. Then I thought, hey, I should make a tutorial for these ornaments. Then I decided to get super crazy and thought I should make a pdf pattern to share with you all. I like to make it easy for you and do all the work. Or I have control issues.

So, without further ado, I present:
Felt Nesting Doll Ornaments | Sweet and easy. Use as Christmas tree ornaments, gift tags on packages, or as adorable dolls for your little ones to play with.

Step 1: Print out the Matryoshka Ornament Pattern below. It should fill one sheet of printer paper.
Matryoshka Doll Ornaments Pattern

Step 2: Cut out each pattern piece in felt of your choice. Cut two of each main body piece. I found it easiest to keep each doll's patterns and felt together in a ziplock bag until it was time to sew. Mostly to keep Jimmy from mixing them all up.

Felt Nesting Doll Ornaments | Sweet and easy. Use as Christmas tree ornaments, gift tags on packages, or as adorable dolls for your little ones to play with.

Step 3: Stack hair and face piece and stitch onto one body piece. I used a basic running stitch, but you can get super fancy here. Or even use a sewing machine. Heck, you can make these ornaments without sewing at all. Just glue them. Hot glue, Elmer's glue, Arlene's glue. Sky's the limit.

Step 4:Stitch dress piece and kerchief tie piece to the same body piece. I added a lazy daisy stitch with a french knot center. You could stitch a heart. Or a button. Or embroider a name. Again, go ahead and run with it.
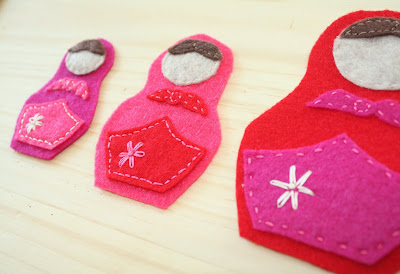
Felt Nesting Doll Ornaments | Sweet and easy. Use as Christmas tree ornaments, gift tags on packages, or as adorable dolls for your little ones to play with.

Step 5: Stitch on a face: two french knots and a curved stitch. I think I will make a man one next with a mustache.

Felt Nesting Doll Ornaments | Sweet and easy. Use as Christmas tree ornaments, gift tags on packages, or as adorable dolls for your little ones to play with.

Step 6: Align the front body piece (the one you stitched all the parts to) with the back piece. Starting at the lower left hand corner stitch up the left side, around the head and back down to the lower right corner. Make sure you add a loop of ribbon so your ornament can hang. I cut my ribbon to 7 inches to make a nice big loop. Little kids can struggle with these things.

Felt Nesting Doll Ornaments | Sweet and easy. Use as Christmas tree ornaments, gift tags on packages, or as adorable dolls for your little ones to play with.

Once you stitch your way back to the right corner, stuff your doll ornament. I used Pellon Perfect Loft which I must say is just lovely to use. It's light and fluffy and easy to stuff. I have also stuffed little guys like this with felt scraps too. It all depends on how finicky you want to get about it. Stitch the remaining bottom edge closed.

Admire your handiwork.

Felt Nesting Doll Ornaments | Sweet and easy. Use as Christmas tree ornaments, gift tags on packages, or as adorable dolls for your little ones to play with.

Happy Holidays, ya'll.

September 7, 2012

Handstitched hoodie class project

This summer I signed up for Handstitched class. I love to do handstitching, which is horrible because life leaves me terribly short on time these days. The class had 20+ projects at part of it. I finally finished one of them.
It may have taken me forever, but I'm in love with my new hoodie. Well, new/old hoodie, since the hoodie was one I have had for a few years, but it's totally new now. I really love the technique used to make the design too. I'd love to make more hoodies. Very, very slowly. Once I finish my 101 UFOs (Un-Finished Objects)
Speaking of less and less time. I've started taking my prerequisites at the local community college in order to go back to school. As if life taking care of a two and a half year old and a one year old wasn't nutso enough. If I can keep fitting fifteen pounds of shit in a ten pound bag, why not try to fit twenty in, eh?
Classes do severely limit my sewing time, which drives me bonkers! Making keeps me sane, you know? But I just keep reminding myself that these classes will lead me to a new career;one that pays a whole lot more than being a stay at home mom. Which means I can buy a whole lot more fabric quilt free.

Think of the fabric, Jill. Think of the fabric!


PS- Yes, I have curlers in my hair. Hey, it's Friday night and I've got a date tonight with my husband. And our kids. And my in-laws. But it still counts, so I'm making it count.

June 24, 2011

Tutorial: Kanzashi flowers

What you need:
Fabric (preferably a woven one that is thicker material)
Scissors or rotary cutter
Ruler or cutting guide
Iron and board
Straight pins
Needle and thread
Hot glue gun or fabric glue
Buttons, beads, embellishments

Cut your fabric into 4" squares. I recommend 3" ones if your going to use them for girl's hair accessories, but I'm making mine to embellish hats. Each square is one petal of your flower and each flower needs 5 petals.

Use your iron to press each square in half to make a triangle.

Next you're going to fold your petals. You will want to have your pins close by. With the top of your triangle pointing away from you, fold the left corner up to the top, bisecting it in half.

Then fold the right corner up to meet the left one, making a smaller square. Holding those folds in place, flip your new small square over keeping the raw fabric edges facing away from you so it is oriented like a diamond.

Fold the left and right corners evenly towards each other so that they touch and meet in the middle.

Fold the fabric together from right to left, sandwiching the points in the center.

Use a straight pin to push through your petal sandwich in the center, making sure to catch the 2 points in the middle.

Repeat the process until all your petals are folded and ready.

Using a sharp pair of scissors, cut the raw edged tail off of your petals. You want to cut close to the pin, but not exactly on top of it. Do not remove the pins yet.

Using your first cut petal as a guide, cut the rest of your petals so that they are the same length.

Use your needle and thread to sew 5 petals together. You want the needle to pass through where your pin is, so that it runs through all the folds and the center points sandwiched inside the petal. Remove the straight pins as you insert the needle.

I usually stack all 5 petals on the needle at once to keep the petals folded and then use a pair of pliers to pull the needle through all the layers of fabric. Then tie a knot to secure a loop of thread. You do not want to tie your loop tightly, otherwise you will not be able to position your petals and open them up properly.

Move your petals around so that they are in a flower shape. Use your thumb to press open the outer point of each petal.

Using your hot glue or fabric glue, put a small amount of glue between each petal to keep the petals from shifting around too much when in use. I also put some glue into the center of the petals from the back side of the flower. Next use a button, beads, covered button, or other embellishment to attach to the center of your kanzashi flower. I sew beads onto felt cut with pinking sheers for these flowers.

Use your kanzashi flowers on hair clips or headbands as they were traditionally worn by geishas. Or put them on hats, jackets or tshirts. You can also make kanzashi flowers out of paper. Make a sweet bouquet or wreath. I'd love to see pics of what ever you make. Email them to thatmoxiegirl@gmail.com