Made with Moxie: 2013

December 10, 2013

Mocha Cinnamon Salt Dough Ornaments

Salted Cinnamon Mocha Dough Ornaments || They smell heavenly and are a fun new family tradition.

Confession time: I am a complete control freak about crafting with my kids. I don't care how big of a mess they make...so long as they don't mess up mine. Sigh. It's horrible, I know. I'm the mom. They have to learn. Who really cares?!?

I'm working on it. Really. This fall when we were carving pumpkins I kept getting twitchy each time Jane reached her sharpie over to try and put a scribble on my pumpkin. It was ridiculous. I eventually gave myself a lesson in letting go and let her draw on my carved pumpkin. All over it's face.

Then I had a beer.

Salted Cinnamon Mocha Dough Ornaments || They smell heavenly and are a fun new family tradition.

Last week Jane and I made some salt dough ornaments. I admit to purposefully waiting until Jimmy was taking his nap to roll them out and paint them. Hey, I let them help mix it all up with me. (And what a mess of baking supplies that was!)

I changed the recipe up a bit though because salt dough is stinky. So I added some chocolate and some cinnamon and some coffee. When you bake these puppies your house will reek of lovely yummy baked goods.

Salted Cinnamon Mocha Dough Ornaments || They smell heavenly and are a fun new family tradition.


Disclaimer: Do not try to eat these salted cinnamon mocha dough ornaments after you have baked them. They will break your teeth. And taste like crap. Better then plain old salt dough ornaments, but still, like crap.

Salted Cinnamon Mocha Dough Ornaments || They smell heavenly and are a fun new family tradition.


Salted Cinnamon Mocha Dough Ornaments:

1 cup flour (use what you have, AP, wheat, etc. I used bread flour.)
1/2 cup salt
1/2 cup + 2 Tbsp coffee (use the leftovers at the bottom of the pot. Or water.)
1/4 cup cocoa powder
1 Tbsp cinnamon

Mix all your ingredients together. Get fancy. Break out the stand mixer. Use a spatula to make sure all dry ingredients get incorporated. Mix for a few minutes until dough is smooth. Resist the urge to pop a bit into your mouth. These are the best diet cookies!

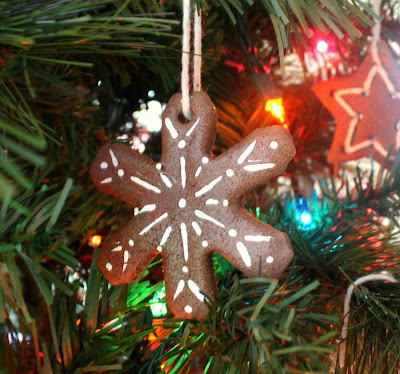
Roll out dough 1/4 inch thick. Use cookie cutters to cut out your favorite holiday shapes (skull and crossbones are Christmas-y, no?) Once you get all your ornaments cut out and on baking sheets, take a drinking straw and poke a hole in the top of each ornament. If you want to stitch up an ornament like the stars, poke more holes.

Bake ornaments at 200 degrees for three to five hours. Yeah, hours. You want to bake this puppies until there is no moisture left in them and they are completely hardened. Don't sweat it tough because for three to five hours your house will smell like heaven. Seriously. My husband came home from work during this step and got all excited thinking I had baked something for dessert.

Salted Cinnamon Mocha Dough Ornaments || They smell heavenly and are a fun new family tradition.


After your salted cinnamon mocha dough ornaments cool completely it's time to decorate! Any acrylic paint will work on your ornaments. Acrylic paint is good because it will dry fast. Children have little patience. (Okay, fine. Me too.) I painted mine with gesso which is white acrylic paint with a polymer added. It's intent is to prime canvases for artwork, but it works fantastic for these. I like it because it is very opaque. And Jane's monstrous glops of it dry out fairly quickly. You can find it at and crafting or art stores.

Once your paint is dried, paint or spray your salted cinnamon mocha dough ornaments with a clear coat. Make sure to cover all surfaces. You want to seal the ornament from getting any moisture in it. After Christmas store your ornaments in a cool dry place.

Salted Cinnamon Mocha Dough Ornaments || They smell heavenly and are a fun new family tradition.

Thread yarn, embroidery floss or ribbon through the holes in the ornaments and you're done! Hang on the tree or even use as fancy schmancy gift tags. Jane is still super excited about them on our tree. I think salted cinnamon mocha dough ornaments will be an annual tradition in our house.

Enjoy!

December 9, 2013

The Moxie Fat Quarter Pack: Sew Mama Sew Giveaway Week!

I'm going to keep this short and sweet so you can enter my giveaways and then hurry back to Sew, Mama, Sew to enter rest. Good luck and thanks for stopping by!

One fat quarter of each of my favorite skull fabrics from my personal Made with Moxie fabric collection.
The Moxie Fat Quarter Pack:One fat quarter of each of my favorite skull fabrics.


a Rafflecopter giveaway
Don't forget! I have three other giveaways here:
Three Hand Stamped Sea Bee Bar Towels
Bundle of 7 Indy Sewing Patterns worth over $85
Quilting Isn't Funny digital book by The Bitchy Stitcher

Thanks for stopping by and good luck in the giveaways today! Drawing will be pulled Sunday December 15th at 5pm EST.

Sew Mama Sew Giveaway

Favorite Indy Patterns Bundle: Sew, Mama, Sew Giveaway Week

I'm going to keep this short and sweet so you can enter my giveaways and then hurry back to Sew, Mama, Sew to enter all the rest. Good luck and thanks for stopping by!

Made with Moxie: Sew, Mama, Sew Giveaway: Favorite Indy Patterns Bundle
Seven of my favorite Indy Sewing Patterns. Worth $85 value.

Clockwise from top left:
The Reversible Zippy Hoodie (18m-8y) by Amanda of Kitschy Coo
The Go To Cape for women by Andrea of Go To Patterns
The Bimaa Sweater for kids by Sarah of EmmylouBeeDoo
The Prefontaine Shorts for kids by Jill of Made with Moxie
The Commuter Cowl by Shannon of Very Shannon & Luvinthemommyhood
The Aragon Bag by Sara of Sew Sweetness
The Meridian Cardigan for women by Rachael of imagine gnats

a Rafflecopter giveaway Don't forget! I have three other giveaways here:
The Moxie Fat Quarter Pack
Three Hand Stamped Sea Bee Bar Towels
Quilting Isn't Funny digital book by The Bitchy Stitcher

Thanks for stopping by and good luck in the giveaways today! Drawing will be pulled Sunday December 15th at 5pm EST.

Sew Mama Sew Giveaway

Three Hand Stamped Sea Bee Bar Towels: Sew Mama Sew Giveaway Week!

I'm going to keep this short and sweet so you can enter my giveaways and then hurry back to Sew, Mama, Sew to enter the rest. Good luck and thanks for stopping by!

Made with Moxie: Sew, Mama, Sew Giveaway: Hand Stamped Flour Sack Bar Towels .
Set of Three Hand Stamped Sea Bee Flour Sack Bar Towels.


a Rafflecopter giveaway
Don't forget! I have three other giveaways here:
Bundle of 7 Indy Sewing Patterns worth over $85
The Moxie Fat Quarter Pack
Quilting Isn't Funny digital book by The Bitchy Stitcher


Thanks for stopping by and good luck in the giveaways today! Drawing will be pulled Sunday December 15th at 5pm EST.

Sew Mama Sew Giveaway

December 6, 2013

Quilting Isn't Funny by The Bitchy Stitcher

Here's something you may not know about me: I love to read. Books, magazines, blogs, you name it. Other than the board book I just fished out of my washing machine, I love books. (Thank you, children. It was really no longer a book but millions of effing pieces of wet cardboard all over flannel, fuzzy knits and tulle. Yeah, tulle.)

What you do already know is that I have a love of the bitchy. The boat shakers. The people who don't really care what "people" think. You should know that I love Megan Dougherty, aka The Bitchy Stitcher. Megan writes a funny ass blog about quilting. Because quilting is funny. And frustrating. And Megan writes some funny stories. So many so, that she wrote a book.

The funniest quilting book I've ever read. Thank God someone has a sense of humor around here. Enter to win a free copy of Quilting Isn't Funny by Megan Dougherty The Bitchy Stitcher.

Quilting Isn't Funny is a self-published book of awesomeness. If you quilt or someone you know does, you need to get a copy of this book. Once I started reading it, I couldn't stop. I was laying in bed reading it on my Nexus, snorting and giggling. Sadly, my husband doesn't get quilting humor so I was left to keep it all to myself. I wish I could have read it with like minded quilty folk, like yourselves. (Megan, I'm thinking you need to do a book reading tour. All beatniky with a black turtle neck and a beret though please.)

Consider getting yourself this book as a stocking stuffer. They even come autographed! Buy one for your mom and mother in law. (That is, if your mother in law didn't already buy herself a copy, like mine did!) You can grab your own right here. If you are a husband or boyfriend looking for another great gift idea, I highly recommend the Quilter's Shirtless Man and A Spicy Burrito Calendar, or QSMASMC 2014. Yes, I'm not joking, it is a real thing. I have my own copy, thank you very much. It is a beautiful calendar chock full of lovely, mostly naked men with gorgeous quilts and scrumptious burritos. What more could you want?

I can't wait to get my own signed copy. It's going right in my bathroom. Hey, it's where all my favorite books go.

Be sure to check out the rest of the reivew on Megan's Quilting Isn't Funny tour:


Dec. 2 - Maddie Kertay  - Bad Ass Quilter’s Society

Dec. 3 - Sam Hunter – Hunter’s Design Studio

Dec. 4 - Carla Crim – Scientific Seamstress

Dec. 5 - Scarlett Burroughs – Craft Gossip

Dec. 6 – Jill Dorsey – Made with Moxie
           

Dec. 9 - Victoria Findlay Wolfe – Bumble Beans Inc
           
Dec. 10 - Lynn Harris - Little Red Hen

Dec. 11 – Teresa Coates – Crinkle Dreams

Dec. 12 - Joshua Helms - Molli Sparkles

Dec 13 - Liz Kettle – Stitch Journeys

Dec. 14 - Leah Day – The Free Motion Quilting Project


Dec 16 - Lisa Sipes – That Crazy Quilty Girl
           
Dec. 17 - Charlotte Newland – Displacement Activity

Dec. 18 - Teri Lucas - TerifiCreations

Dec. 19 – Cheryl Sleboda – Muppin.com

Dec. 20 – Kelly Biscopink – Stitchy Quilt Stuff


Jan. 6 – Generation Q

Jan. 8 – Rose Hughes – Rose Hughes – Quilt Artist

Jan. 9 – Janice Ryan – Better Off Thread

Jan. 10 - Flaun Cline – I Plead Quilty


Jan. 13 – Heather Jones – Olive and Ollie

Jan. 14 – Meg  – Without A Stitch On

Jan. 15 – Laura Lochore – Quokka Quilts

Jan. 16 – Elaine Wong Haselhuhn – Dashasel Sews

Made it down this far, eh? Want to win your own free, digital copy of Megan's book, Quilting Isn't Funny ? Leave me a comment here and tell me what you want most for Christmas. Contest ends Friday, December 13, 2013 at 12 pm EST and will be drawn at random. If you are a no-reply blogger, please leave your email address in your comment, too. Not sure if you are a no-reply blogger or not? Do you never get replies from bloggers or never win contests? Go read this post about how to fix your No-Reply Status.

I was given a digital copy of this book for free so that I might review it. All opinions expressed here are my own. I have also ordered my own physical copies before Megan asked me to be on the tour. She's that funny and you know I love to support small, local and handmade.

December 3, 2013

Best Felt Russian Stacking Doll Ornaments

Everything I do I must make more complicated. I decided to make these little Russian doll ornaments to add into a Christmas gift for a friend. Then I thought, hey, I should make them into a blog post. Then I thought, hey, I should make a tutorial for these ornaments. Then I decided to get super crazy and thought I should make a pdf pattern to share with you all. I like to make it easy for you and do all the work. Or I have control issues.

So, without further ado, I present:
Felt Nesting Doll Ornaments | Sweet and easy. Use as Christmas tree ornaments, gift tags on packages, or as adorable dolls for your little ones to play with.

Step 1: Print out the Matryoshka Ornament Pattern below. It should fill one sheet of printer paper.
Matryoshka Doll Ornaments Pattern

Step 2: Cut out each pattern piece in felt of your choice. Cut two of each main body piece. I found it easiest to keep each doll's patterns and felt together in a ziplock bag until it was time to sew. Mostly to keep Jimmy from mixing them all up.

Felt Nesting Doll Ornaments | Sweet and easy. Use as Christmas tree ornaments, gift tags on packages, or as adorable dolls for your little ones to play with.

Step 3: Stack hair and face piece and stitch onto one body piece. I used a basic running stitch, but you can get super fancy here. Or even use a sewing machine. Heck, you can make these ornaments without sewing at all. Just glue them. Hot glue, Elmer's glue, Arlene's glue. Sky's the limit.

Step 4:Stitch dress piece and kerchief tie piece to the same body piece. I added a lazy daisy stitch with a french knot center. You could stitch a heart. Or a button. Or embroider a name. Again, go ahead and run with it.

Felt Nesting Doll Ornaments | Sweet and easy. Use as Christmas tree ornaments, gift tags on packages, or as adorable dolls for your little ones to play with.

Step 5: Stitch on a face: two french knots and a curved stitch. I think I will make a man one next with a mustache.

Felt Nesting Doll Ornaments | Sweet and easy. Use as Christmas tree ornaments, gift tags on packages, or as adorable dolls for your little ones to play with.

Step 6: Align the front body piece (the one you stitched all the parts to) with the back piece. Starting at the lower left hand corner stitch up the left side, around the head and back down to the lower right corner. Make sure you add a loop of ribbon so your ornament can hang. I cut my ribbon to 7 inches to make a nice big loop. Little kids can struggle with these things.

Felt Nesting Doll Ornaments | Sweet and easy. Use as Christmas tree ornaments, gift tags on packages, or as adorable dolls for your little ones to play with.

Once you stitch your way back to the right corner, stuff your doll ornament. I used Pellon Perfect Loft which I must say is just lovely to use. It's light and fluffy and easy to stuff. I have also stuffed little guys like this with felt scraps too. It all depends on how finicky you want to get about it. Stitch the remaining bottom edge closed.

Admire your handiwork.

Felt Nesting Doll Ornaments | Sweet and easy. Use as Christmas tree ornaments, gift tags on packages, or as adorable dolls for your little ones to play with.

Happy Holidays, ya'll.

November 26, 2013

How to bring home yards of fabric so your husband won't say a word

Sometimes you happen upon a fabulous sale at your favorite quilt shop. Sometimes there is a new line of prints that is just too gorgeous to pass up. Sure, you need more fabric like a hole in the head and you probably don't even know what you're going to make with it. But you did bought it all anyways and now you've got to get it in the house before your husband starts the You Bought *More* Fabric lecture. Here is my fool proof method:

How to bring home yards of fabric so your husband won't say a word.

Step One: Walk in the door and immediately put your fabric in the washing machine to start its pre-wash. (Yes, pre-washing your fabrics is important!)

Step Two: Go find your husband, if he hasn't found you already. Bring him to your bedroom. Have hot sex with him. (If necessary, put your kid's favorite movie on in the living room.)

Step Three: Move your fabric from the washing machine into the dryer.

Step Four: Make your husband a sandwich. Or potato salad. Or a pie. Serve him the food with a beer.

Step Five: Remove your fabric from the dryer. Empty the lint trap. Go press your fabric, fold it and put it away.

Happy Thanksgiving y'all! And Happy Fabric Shopping! wink, wink

November 22, 2013

Go play outside

If I think back about it, a large portion of my childhood memories were outside. My brothers and I spend a lot of time outside in our front and backyards. Climbing trees. Building forts. Riding bikes. All the sticks, leaves and dirt we could handle. My mother was forever telling us to go outside. Go play outside.

Go play outside!

"Go play outside" is a phrase that was missing from my mom vocabulary up until this point. I spent all spring and summer trying to send my kids out in our un-fenced back yard while I studied indoors only to look up and wonder, where the hell have they gone! Every few minutes I'd look up out the screen door and, poof, no kids. They'd be playing with the hose, or in the drive way, or, my personal favorite, on the porch ringing the doorbell.

Go play outside!

I don't know what did it, but suddenly something has changed. My kids ask to go outside. I bundle them up in hoodies or jackets, and hats and mittens, then out they go. They collect leaves. They make piles of sticks. They play pretend and are secret agents solving mysteries. They love it, *and* they stay in the back yard now. Which means I can finally get more stuff done.

Go play outside!

Go play outside!

"Go play outside." It's such a beautiful thing. I want to cry, I love it so much. Being a SAHM to two small kids, going back to school, and running a business is a lot. It only takes a straw to break the camel's back. But now the burden is eased! I've got an eight page paper due on urinalysis? "Who wants to go play outside?" Kitchen full of dirty dishes and two kiddos running and screaming like cowboys and Indians? "Go play outside!"

Go play outside!

Go play outside!

I've found myself a small sliver of ease. Slowly, but surely, I am gaining my sanity back. Ok, not sanity so much, as balance. I have time to take a break now. Just a few more minutes in my day to get things done. I will champion the insanity of my life.

The beauty of it all is that my kids benefit from playing outside too. They get a little vitamin D. They expel some of their boundless energy. They learn to play together. They develop creativity. By playing outside they gain independence. So I can feel good about sending them out to play. If only cookies were good for them...I'd be invincible.

Go play outside!

Now go play outside!

November 19, 2013

Caramel Pie with Moxie Crust

I am about to let you in on a Secret Family Recipe. This pie is the best pie you will ever make. No contest. Bake it for Thanksgiving dinner and even your snippy mother-in-law will have nothing bad to say (if she tries to open her mouth, stuff more pie in it). Caramel pie with Moxie Crust is easy, fast, and you can make it the day ahead of time!

Caramel Pie with Moxie Crust || The best pie you'll ever bake for Thanksgiving. Better make two!

Caramel Pie with Moxie Crust

Ingredients:
6 Tbsp. butter
1/2 cup flour
2 cups brown sugar
2 tsp. vanilla
2 eggs
2 cups milk
1 box Trader Joe's pie crust (in the freezer section)

Now before you even start to say what I know you're going to say: that homemade crust is better. Frozen crust is just meh. That frozen butter and vodka pie crust is the only way to go. I say phooey! I tried Trader Joe's pie crust last year on the advice of Jane from Buzzmills. My family loves pie. I love to make pies, I just hate to make the crust. I never have butter frozen into pats ahead of time and to be honest using the Cusinart scares me. It's a surprise I have all my fingers given my sewing mishaps. That Cuisinart promises to mangle my hand on day. No joke. It's the pie crust making that prevented my family from eating more pies.

So I tried Trader Joe's frozen pie crust. And we loved it. Given a handmade pie crust versus Moxie Pie Crust taste test, I don't think you would be able to tell the difference. Since making the switch, we've had so many heavenly pies with Moxie Crust. Try it. Don't tell anyone. They'll never know. (Note: this is not a sponsored post. I'm letting you in on my pie baking secrets. Shhhh!)

Caramel Pie with Moxie Crust || The best pie you'll ever bake for Thanksgiving. Better make two!

Instructions:
Preheat your oven to 450 degrees.

Butter a 9" pie pan and put your pie dough in it. Blind bake your crust for 10 minutes or until a lovely golden color. Don't forget to use a piece of parchment paper or a coffee filter and dry beans, rice or lentils to weight your pie crust while baking. (I may have forgotten once and had to pick black beans out of the bottom of my crust. Hey, no one knew.)

Cream butter, flour, sugar, and vanilla.

Beat eggs and milk. Add to butter/sugar mixture.

In a 2 quart sauce pan, cook over medium heat until thick like pudding. Use a spatula and/or a whisk. Do not stop stirring and don't let it get chunky. Seriously, do not walk away. You will burn it. Not that I have ever done that.)

Cool caramel pie filling a bit, then pour in baked pie crust. Pour any extra into a small ceramic bowl. Eat it before anyone realizes there is extra filling. Refrigerate Caramel Pie. Read a magazine. Have a cup of coffee

Put your apron on and toss a bit of flour on yourself. Sigh as your serve your Caramel Pie with Moxie Crust, and smile like you're exhausted from making for hours. Make sure you get an extra big piece for yourself. Enjoy as everyone tells you what a damn fine pie you've made. Wink at your snippy mother-in-law.

Caramel Pie with Moxie Crust || The best pie you'll ever bake for Thanksgiving. Better make two!

Warning! Once you bake a Caramel Pie with Moxie Crust, everyone will always want you to bring one again. Consider baking two for Thanksgiving. No one will want Aunt Martha's pumpkin pie again.

November 16, 2013

Winter Wonderland Collection

If you have little ones to sew for this holiday season then you should consider getting yourself a copy of the Winter Wonderland Collection of sewing patterns by the ladies at Pattern Anthology.

Winter Wonderland Collection: Juliet Capelet, Trapper Hat and Johnny B. Good Hoodie

The collection is everything from hats and capes to a blazer and party dress and all sorts of garments in between. It's everything you need for your little ones to take you through the holiday seasons. The pattern collection will have you dreaming of crisp cool air, warm holiday baking, sparkling lights, and cozy evenings with family.

Winter Wonderland Collection: Juliet Capelet, Trapper Hat and Johnny B. Good Hoodie

Winter Wonderland Collection: Juliet Capelet, Trapper Hat and Johnny B. Good Hoodie

For Jimmy, I sewed him up a Johnny B. Good Hoodie (it also comes with a hood collar option) and a Trapper Hat (which also has a pilot style hat option too.) The Trapper hat sews together so quickly and easily. I'm in love. I would recommend sizing it up if you are going to use a fluffy lining fabric, like minkie, fleece or fake fur. Jimmy loves his Trapper hat. I see many versions of these to come.

The Johnny B. Good hoodie shirt is an adorable retro style shirt. I just love my little man in a collared shirt. This pattern makes it super easy to make too, with less pattern pieces than a normal collared shirt pattern. But I've got to tell you my favorite part about this pattern is that it includes instructions on how to upcycle a men's dress shirt into one for your little dude! I used one of my husband's old shirts that he had gotten a stain on, then added the contrasting front and back yokes. The pattern has pieces to make your own cuff plackets, but I just used the ones on my husband's shirt sleeves. So much easier than sewing a dress shirt from scrap, and you get to have nice shirting fabric for your boys without paying an arm and a leg.

Winter Wonderland Collection: Juliet Capelet, Trapper Hat and Johnny B. Good Hoodie

Winter Wonderland Collection: Juliet Capelet, Trapper Hat and Johnny B. Good Hoodie

Jane looked through the Winter Wonderland Collection and chose the Juliet Capelet. All of a sudden she has decide she is big enough to be deciding what I will make for her. I sense trouble. We decided on the rounded hood option with no ruffle. I lined the hood and capelet with creme minkie for extra warmth. To make this piece more cape than capelet, I cut the neck of the pattern at her true size, but cut the bottom hem at a size larger. The toggle closures are from Joann's. I think they finish the look off nicely and bonus points that they are kid "I can do it myself" friendly.

Winter Wonderland Collection: Juliet Capelet, Trapper Hat and Johnny B. Good Hoodie

Winter Wonderland Collection: Juliet Capelet, Trapper Hat and Johnny B. Good Hoodie

The Winter Wonderland Collection is a good deal because you're getting a bundle of patterns that you can use for years. The sizes span from 18 months on up to 8 years. The patterns are great styles than can be easily remixed to reflect whatever look you (or your opinionated kids) are going for. Plus, you're getting the patterns for 25% thank retail once they have been bundled. You can even snatch up a Mini Bundle of just the girls or boys patterns.

The Winter Wonderland Collection is only available for a limited time and you only have two days left! Do not delay. You can have adorable outfits for your kiddos for each holiday through the cold weather season. And that means no ugly polar bear dork sweaters have to be worn.

Click the image below to be taken to be taken to the Winter Wonderland Collection site.

Winter Wonderland Collection blog button

Disclosure: I received a copy of the Winter Wonderland Collection in exchange for my making something to share with you all. All opinions and ideas my own. End of story.

November 11, 2013

Tablet Clutch Tutorial

Fact #1: Sewing with laminate fabric scared me.

Fact #2: My children are notorious for spilling all sorts of liquids onto my technologies.

And those two facts are what has brought me to today's tutorial. Check it out!

Tablet Clutch Tutorial for your Nexus 7 featuring laminate from Casa Crafty || Made with Moxie

A few weeks ago Kelley of Casa Crafty asked me if I would make a sewing project to share with you all if she sent me a fat quarter of Echino laminate fabric from her shop.Now prior to this I have never sewn with laminate before so it scared the poop out of me, but like you all I am a sucker for free fabric and a new tutorial, so I faced my fears!

While sewing with laminates has is own set of challenges, like not using pins (I used scotch tape) and you can't press it long at all even with a pressing cloth (yes, I pressed if for two seconds too long), it really isn't that bad at all. In fact, it's really fun. Seriously. I'd rather sew with laminates than sew with knits. Any day of the week.

I made this adorable little envelope clutch to store my Nexus 7 tablet in. My children have a sixth sense about technologies and beverages. I've had a laptop smell like gingerbreak latte, another that took a Punkin Dogfish Head beer...you see the pattern. I really like my Nexus so I use this opportunity to see if I couldn't make it live a bit longer before it gets inevitably bathes in coffee or beer.

Tablet Clutch Tutorial for your Nexus 7 featuring laminate from Casa Crafty || Made with Moxie

Laminate Tablet Clutch (or really, carry what ever you'd like in it):

Finished measurements: 9.5" wide x 6" tall

Materials:
One (1) fat quarter of laminate
One (1) fat quarter of quilting fabric for lining
One (1) fat quarter of Pellon Wonder-Under
10" length of elastic

Tablet Clutch Tutorial for your Nexus 7 featuring laminate from Casa Crafty || Made with Moxie

Step 1: Fussy cut a rectangle from your laminate that is 10" wide and 18" tall. Also cut 10" x 18" rectangles from your lining fabric and Wonder-Under. Use the Wonder-Under to fuse the laminate with the lining fabric wrong sides together. Do not press the laminate with your bare iron surface. You will curse yourself, if you do this. I laid my laminate face down on my ironing board, fused the Wonder-Under to the back of it, then put the lining fabric on top and pressed it to fuse it all together. Make sure you have fused all the edges well. Trim your rectangle to 9.5" x 17.5".

Step 2: Lay your laminate sandwich face down. If you have a directional fabric, make the pattern upside down, too. (As it is laying face down, if you folded up the bottom two corners, your print should look right side up.) From the bottom of your rectangle, mark a line 6" up on your lining fabric. This is where you will fold it up to make the clutch body.

Step 3: On the top edge of your sandwich, make a mark 2" away from the right corner. From the top, mark 4.5" down from the corner on both the left and right sides. Use a ruler and draw a straight line from each of these marks up to the mark on the top that is 2" from the right corner. Use a rotary cutter or sharp scissors to cut off the excess triangles to create your asymmetrical envelope flap.

Step 4: Fold your laminate sandwich up along the 6" line to make the clutch body of the bag. Use scotch tape or clothes pins to hold the bag edges in place. You can use a pressing cloth and an iron on medium heat to press the fold in the bag, but do not press it for very long or the laminate will melt to your pressing cloth. Tape or pin your elastic across the width of the clutch 3" up from the folded edge. starting at the bottom right corner, stitch up the side of the clutch body with a scant 1/4" seam allowance. Continue up around the envelope flap edges and back down the left side of the bag. Make sure to catch the elastic edges as well. Make sure your elastic is ever so slightly taut. Trim your elastic to the edges of the clutch. Use a lighter to seal the edges of the elastics. Use your pressing cloth and iron to press the envelope flap down just above the edge of the bag body.

Step 5: Put tablet into your new laminate clutch. Tuck flap under elastic and go!

Tablet Clutch Tutorial for your Nexus 7 featuring laminate from Casa Crafty || Made with Moxie

Need some laminate fabric? Please visit the Casa Crafty shop. I used Echino Nico laminate scooters for my Tablet Clutch. Kelley has a great selection of laminate fabrics and at $15 a half yard, you can make at least two, if not three Tablet Clutches out of it. Way cheaper than buying yourself a new tablet once your kids dunk it in coffee and milk. Am I right? Also, if you have any questions about sewing with laminate, do not hesitate to contact Kelley. She is the queen of sewing with odd fabrics and knows every trick in the book!

Extra added bonus deal! Kelley has made use a coupon code to use for 25% off until the end of November. Woot! That's huge! Thank you, Kelley. Use code MOXIE25 at the check out.

Just for the fun of it, I tested my Laminate Tablet Clutch and poured an entire class of water over it. It wiped up easily with a towel and only the elastic strap was wet. Winning!

Disclosure: I received a fat quarter of the laminate fabric for free from the Casa Crafty shop in exchange for my making something to share with you all. All opinions and ideas my own. End of story.